

ClawdBot has been incredibly popular lately - it's all over Twitter, blogs, and video channels, with AI communities buzzing about it. The hype got so intense that Mac Minis are actually sold out! I decided to check it out myself because you never really know until you try it.
I deployed it on a Google Cloud server using my remaining $300 credit. This article provides a detailed walkthrough of the entire setup process - just follow along and you'll have it running.
What is ClawdBot
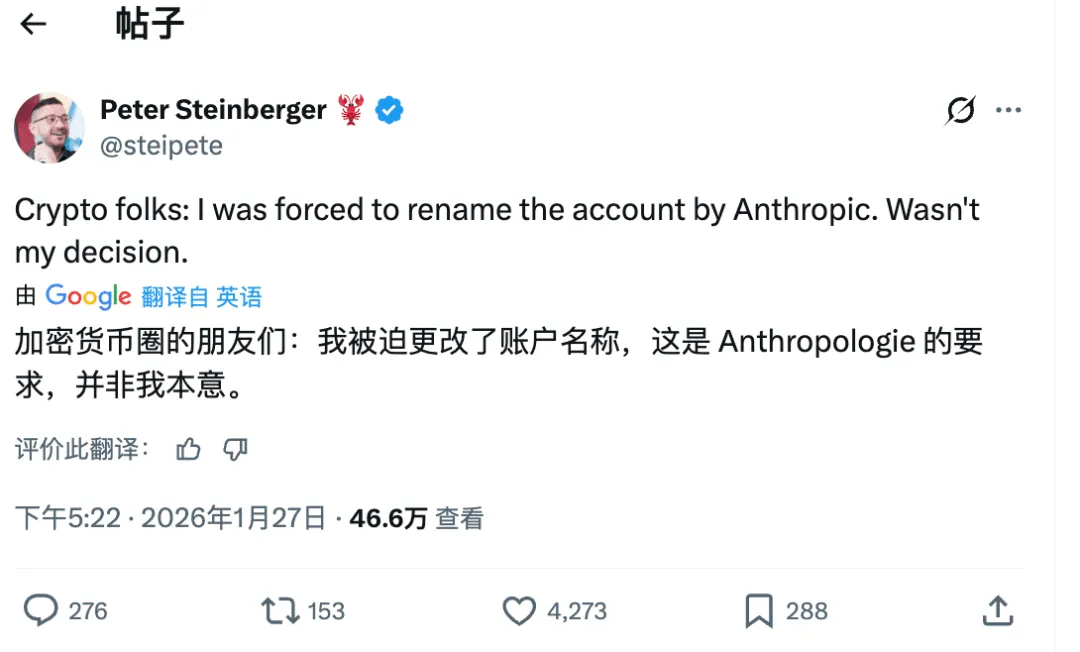
ClawdBot is an open-source AI assistant project that recently changed its name to MoltBot because Anthropic thought the original name sounded too similar to Claude...
Its core selling point is that it can run 24/7 on your own server, and you can remotely control the AI through chat platforms like Discord, Telegram, WhatsApp, and even Feishu (and I've seen people successfully use WeChat too). Plus, it has persistent memory to maintain context.
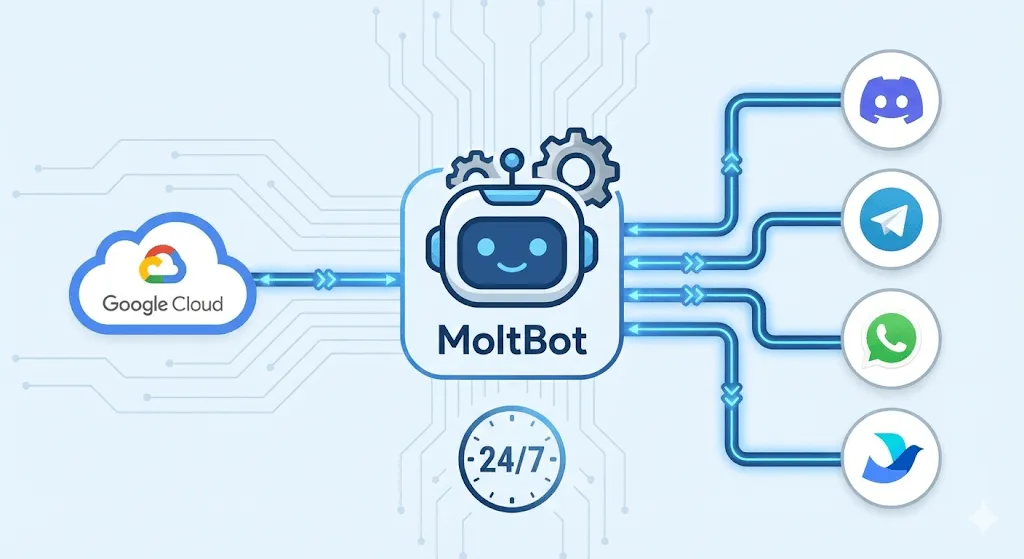
Simply put, it's a super AI assistant with extensive permissions that can help you execute various tasks.
It can control browsers - open web pages, fill out forms, scrape information, monitor product price changes, and notify you when they change.
File operations are no problem either - organizing download folders, batch renaming, and more.
But be careful - I strongly recommend not running this on your main machine. It's too risky.
Enough talk, let's get it deployed and actually try it out.
Create GCP Instance
First, log into Google Cloud Console (console.cloud.google.com), navigate to Compute Engine → VM instances → Create Instance.
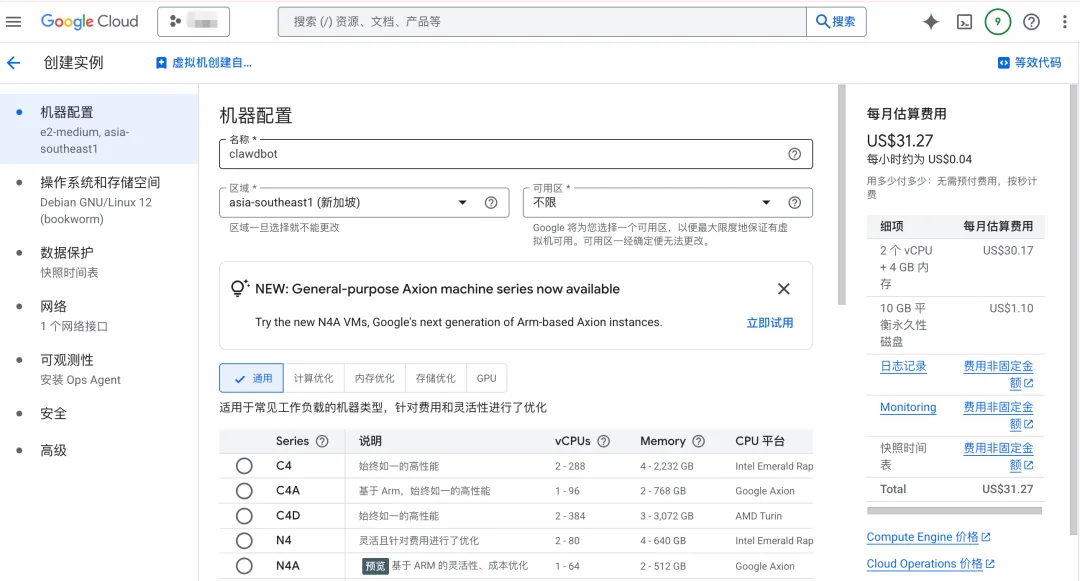
Recommended configuration:
| Configuration | Recommended Value | Notes |
|---|---|---|
| Name | clawdbot-server | Choose any name |
| Region | asia-east1 (Taiwan) or asia-northeast1 (Tokyo) | Choose low latency |
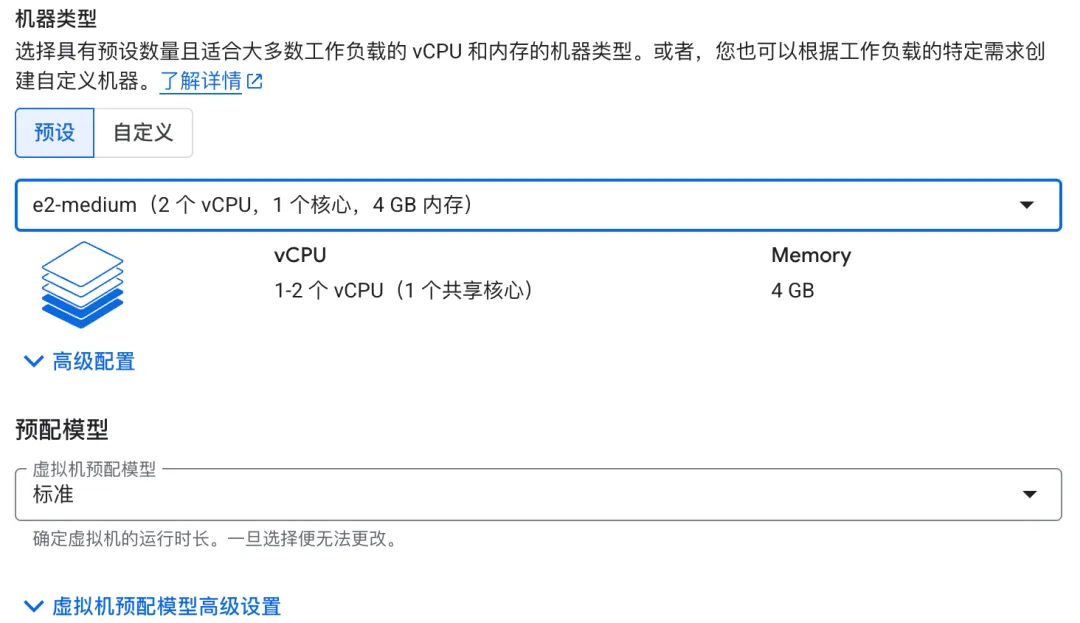
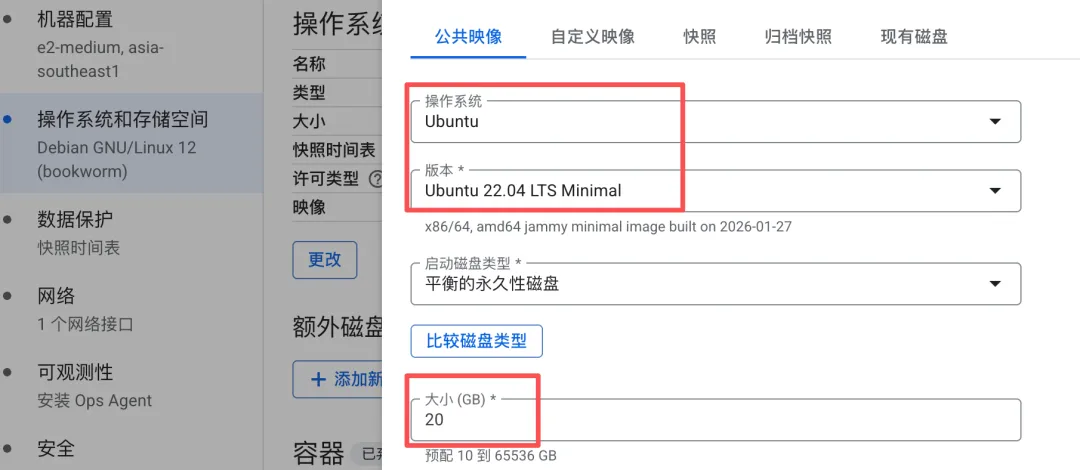
| Machine Type | e2-small (2 vCPU, 4GB) | Sufficient for basic use |
| Boot Disk | Ubuntu 22.04 LTS | Recommended |
| Disk Size | 20GB SSD | Sufficient |
If you need browser automation features, choose e2-medium with 4GB memory (that's what I'm using).
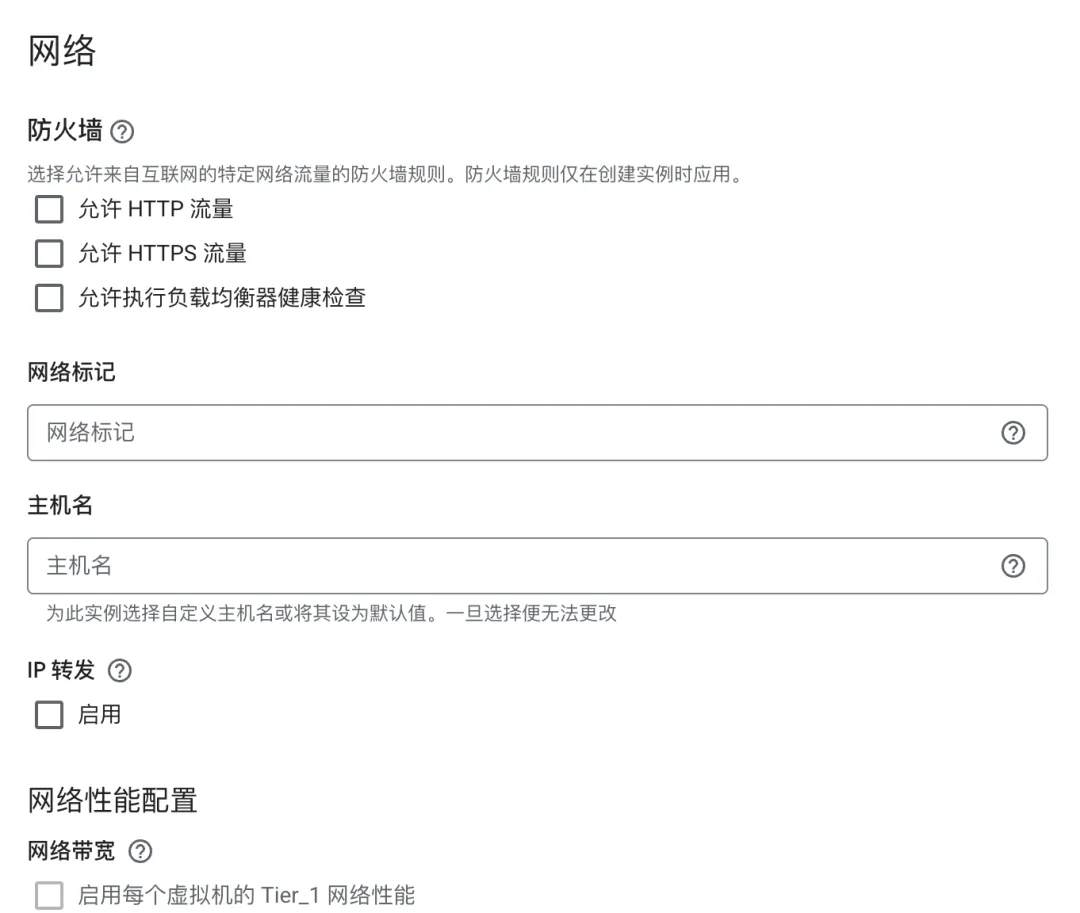
For network configuration, leave all firewall options unchecked and keep the defaults.
ClawdBot primarily interacts through chat platforms and doesn't need web ports exposed. SSH access is allowed by default, which is sufficient for server management.
Security Warning: Do NOT expose port 18789 to the public internet.
Security researchers previously discovered over 1,000 ClawdBot servers exposed to the public due to misconfiguration, leading to leaks of API keys, chat logs, and other sensitive information.
If you need to access the Web UI, use SSH tunneling locally (requires Google Cloud SDK installed first):
gcloud compute ssh clawdbot-server -- -L 18789:localhost:18789
Then run clawdbot dashboard on the server to get a link with a token.
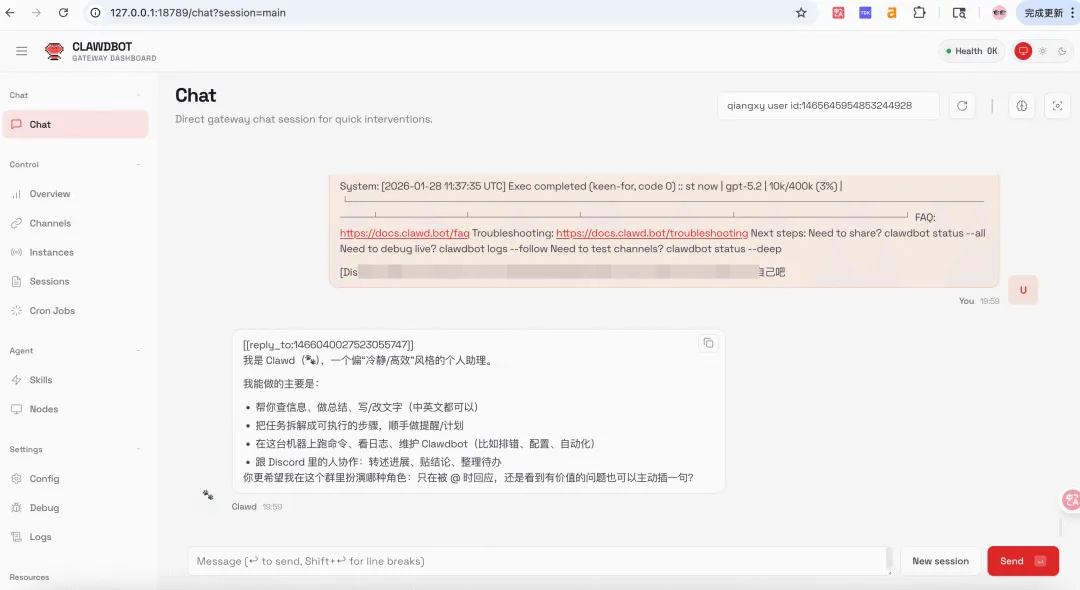
Finally, access http://localhost:18789 locally.
Here's what the dashboard looks like, though the Web UI isn't necessary - most scenarios involve direct chat interaction.
Install ClawdBot
Back to the main task - after creating the instance, click the SSH button to connect to the server, then begin the official installation.
gcloud compute ssh clawdbot-server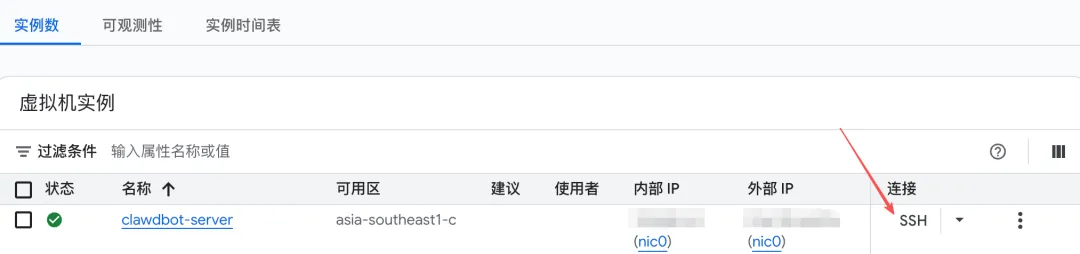
First install Node.js 22, as ClawdBot has version requirements:
curl -fsSL https://deb.nodesource.com/setup_22.x | sudo -E bash -
sudo apt-get install -y nodejs
node --version  # Confirm it's v22+


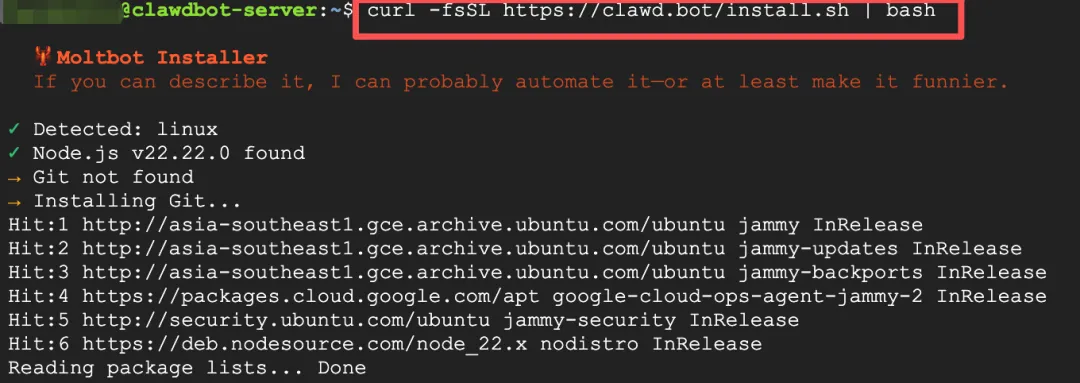
Then install ClawdBot with just one command - very simple.
curl -fsSL https://clawd.bot/install.sh | bashIt takes about two minutes to complete.
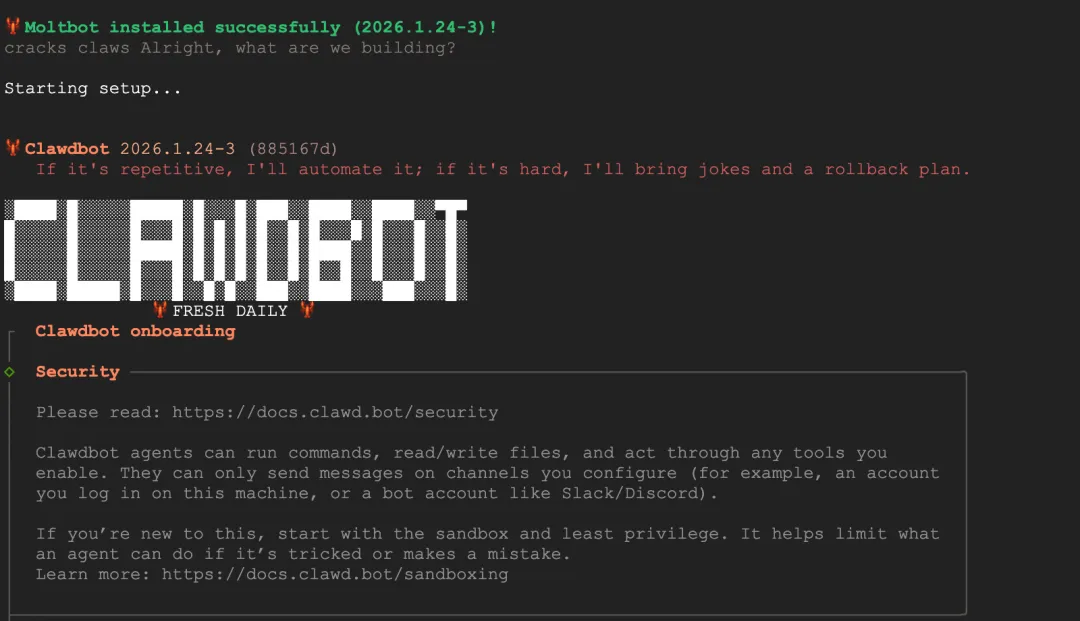
After installation, you'll see a risk confirmation asking if you understand this tool is powerful and inherently risky. Select yes to continue.
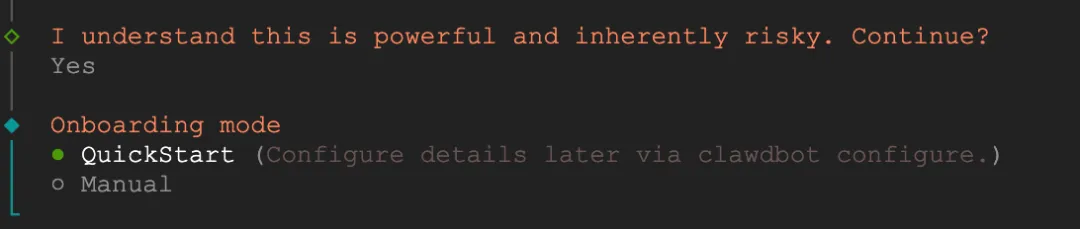
"I understand this is powerful and inherently risky. Continue?

Run Setup Wizard
Next comes a lengthy configuration section - follow the prompts step by step:
-
Select Quickstart mode
-
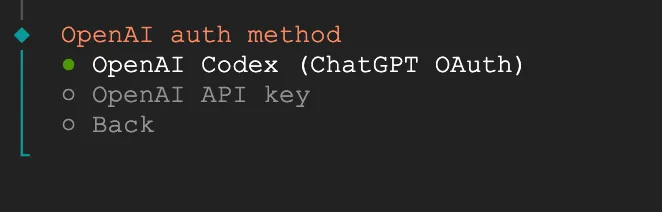
Choose AI provider
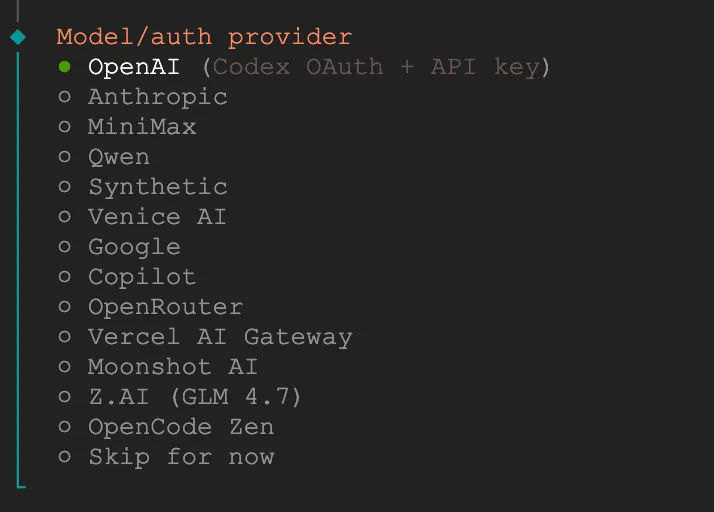
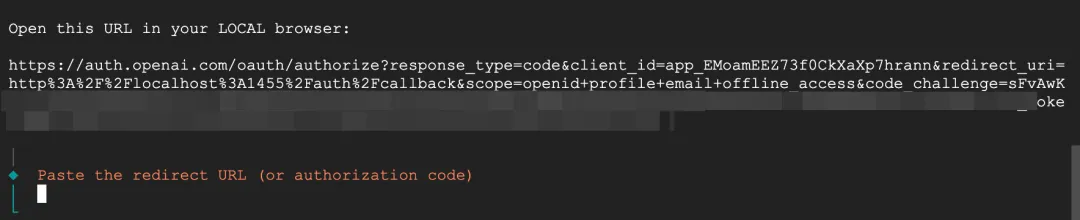
I chose OpenAI to try first. Since I have a ChatGPT Plus subscription, I selected the first authorization login method.
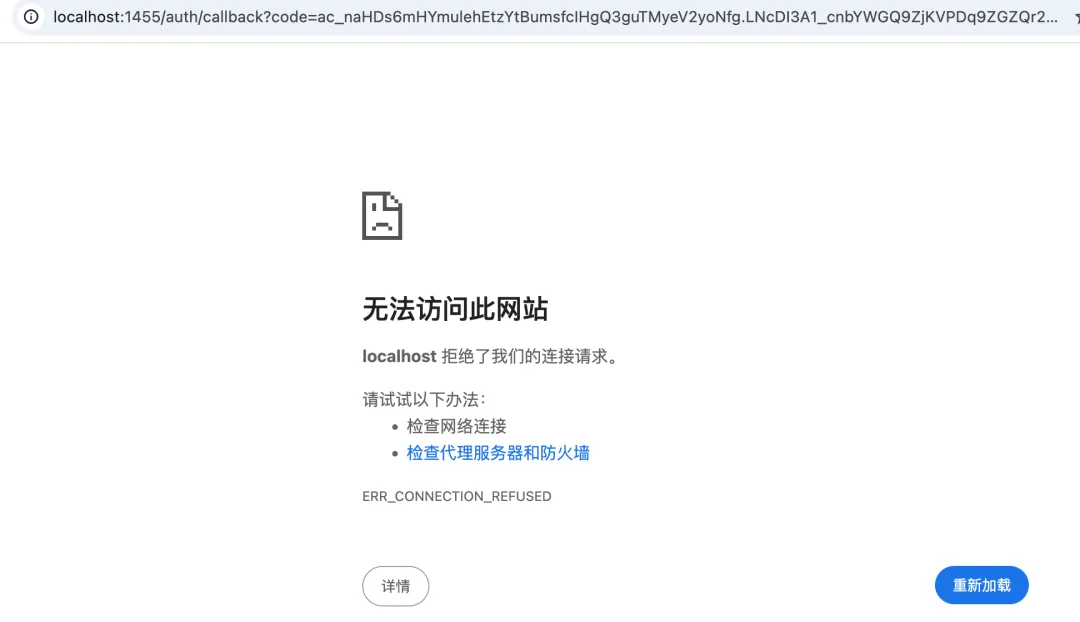
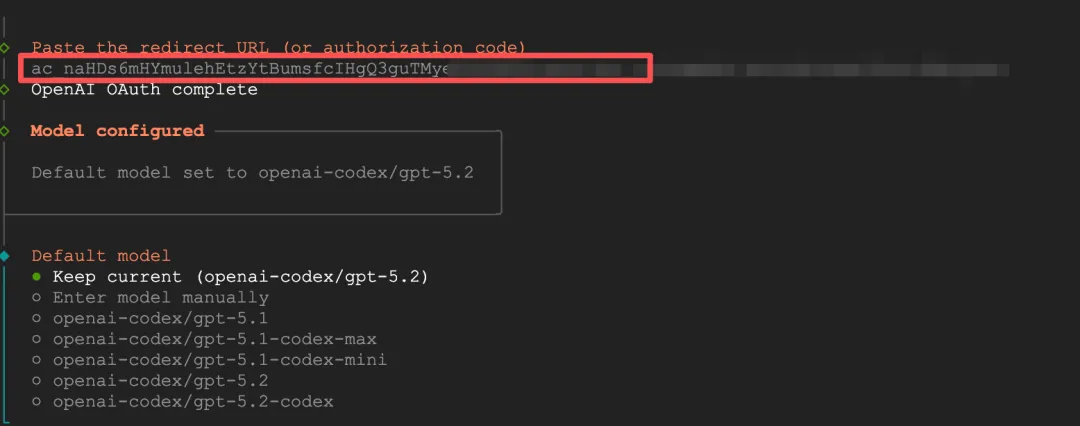
After opening the authorization link in the browser, the page redirected to localhost and failed to load, but there was a code parameter in the URL. I copied and pasted this value into the terminal and it actually worked.
-
Select model - keep the default
-
Choose messaging channel
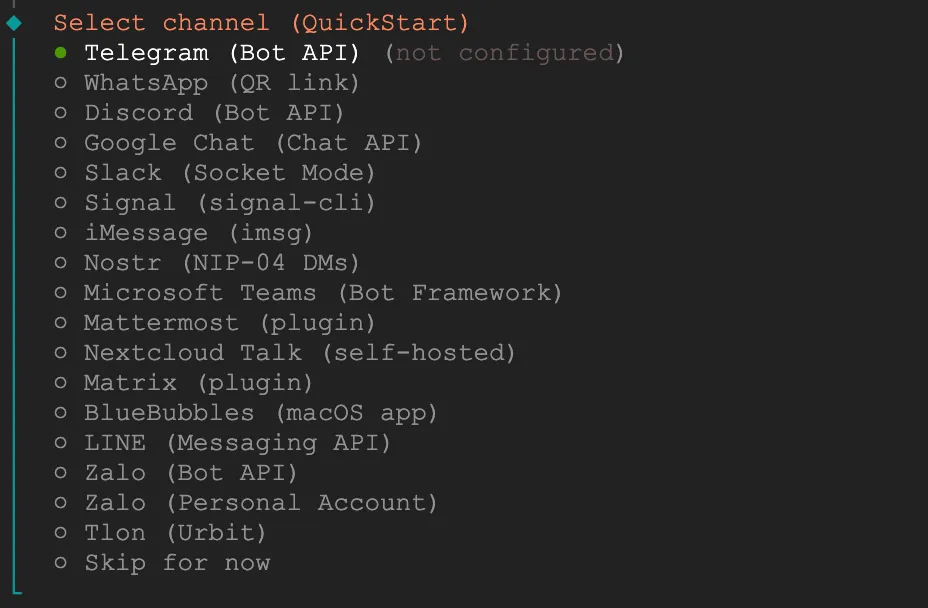
Although Telegram is the simplest to configure, I had some issues with my account, so I switched to Discord since I'm currently building a Discord community.
If you selected Telegram and want to switch to Discord, press Ctrl+C to exit.
Then run this command to restart the full wizard:
clawdbot onboardThis command adds Discord channel separately:
clawdbot channels add discordIf you encounter "command not found", it's a PATH environment variable issue. Execute these commands:
source ~/.bashrc
# or
export PATH="$HOME/.local/bin:$PATH"
Configure Discord Bot (Skip if not using Discord)
If you choose Discord as your messaging channel, you need to create a Bot in the Discord developer portal first.
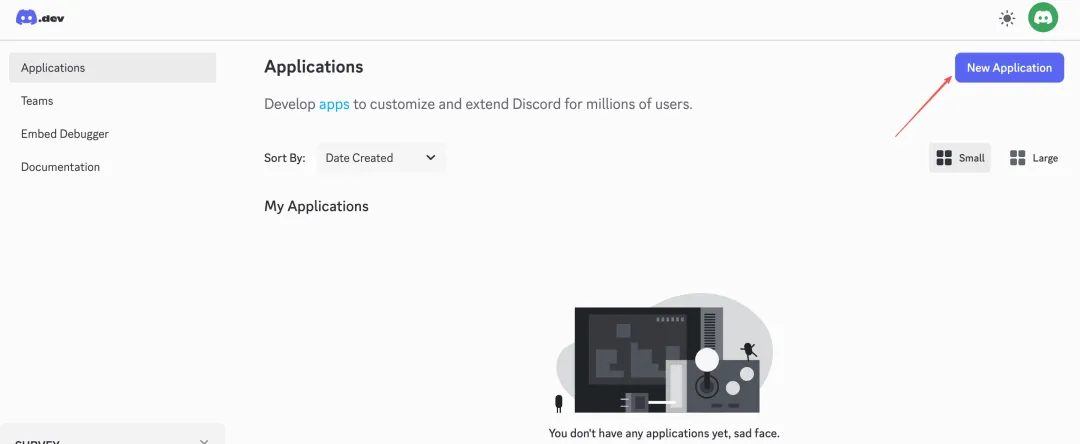
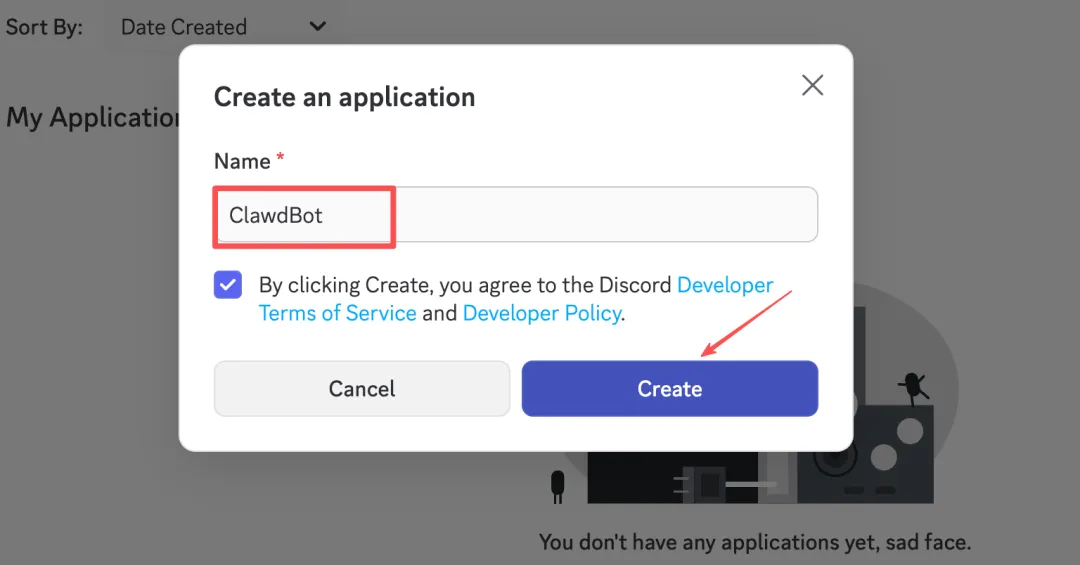
Create Application
Visit discord.com/developers/applications in your browser, log in, click New Application in the top right, enter a name (like ClawdBot), and create.
Get Bot Token
Click Bot in the left menu, then click Reset Token to generate a new Token. This Token is only shown once, so save it.
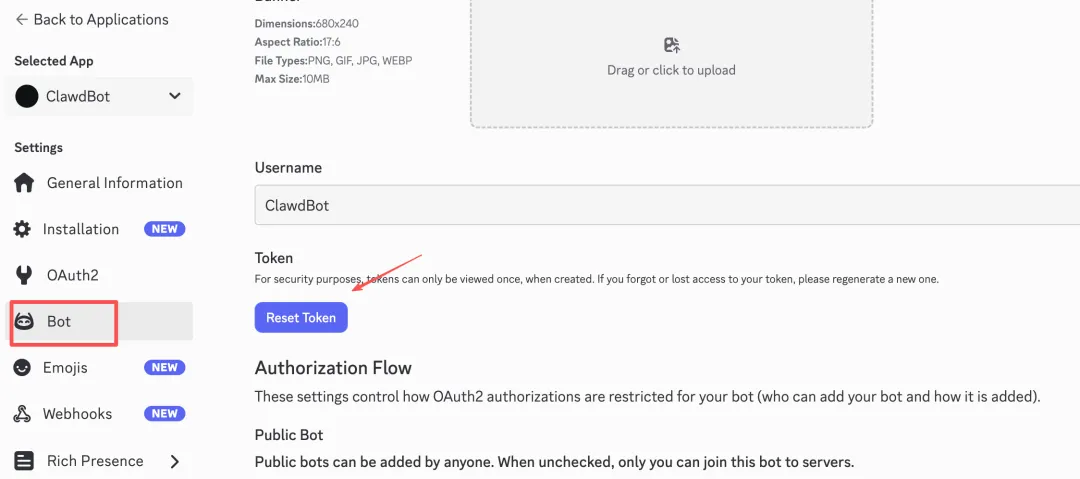
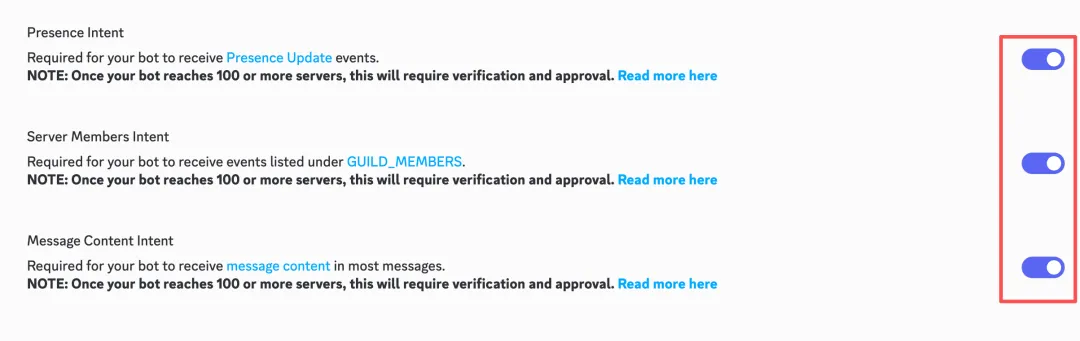
Scroll down and enable these three options:
- MESSAGE CONTENT INTENT (important)
- SERVER MEMBERS INTENT
- PRESENCE INTENT
Remember to click Save Changes.
Invite Bot to Server
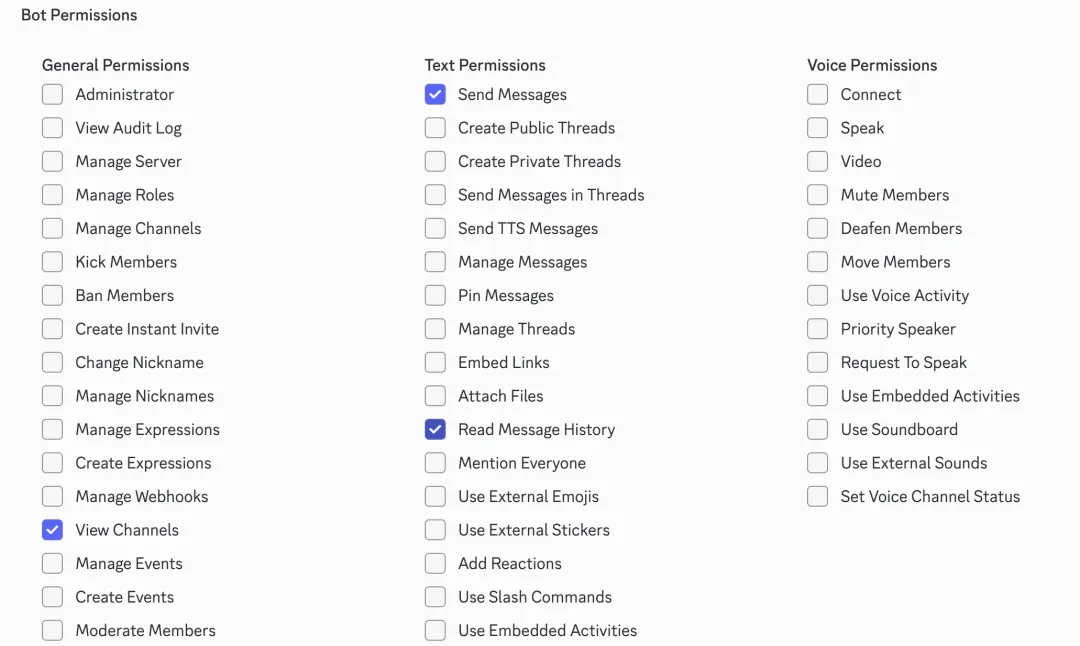
Click OAuth2 → URL Generator in the left menu, check bot and applications.commands in SCOPES.
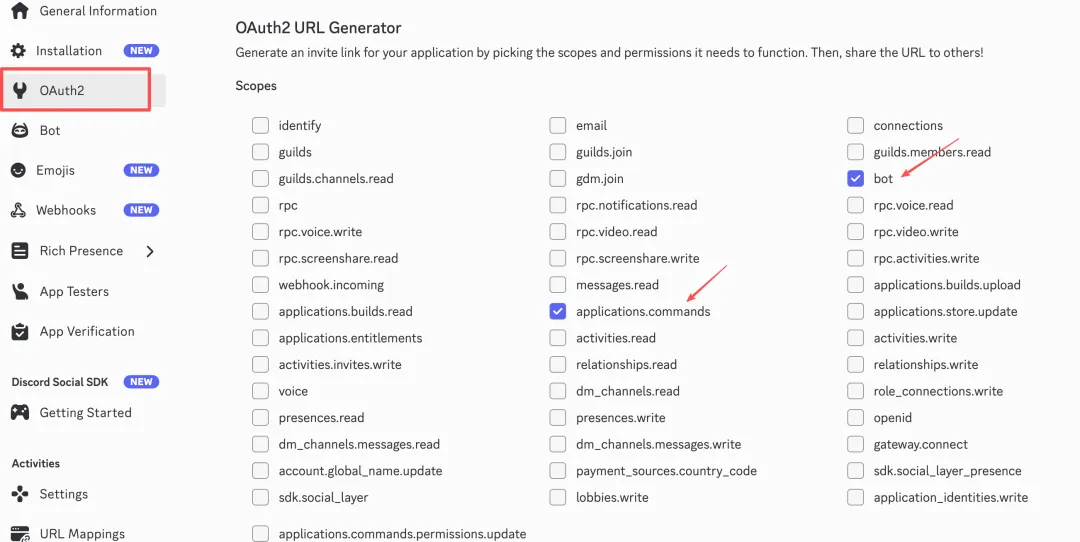
In BOT PERMISSIONS, check Send Messages, Read Message History, and View Channels.
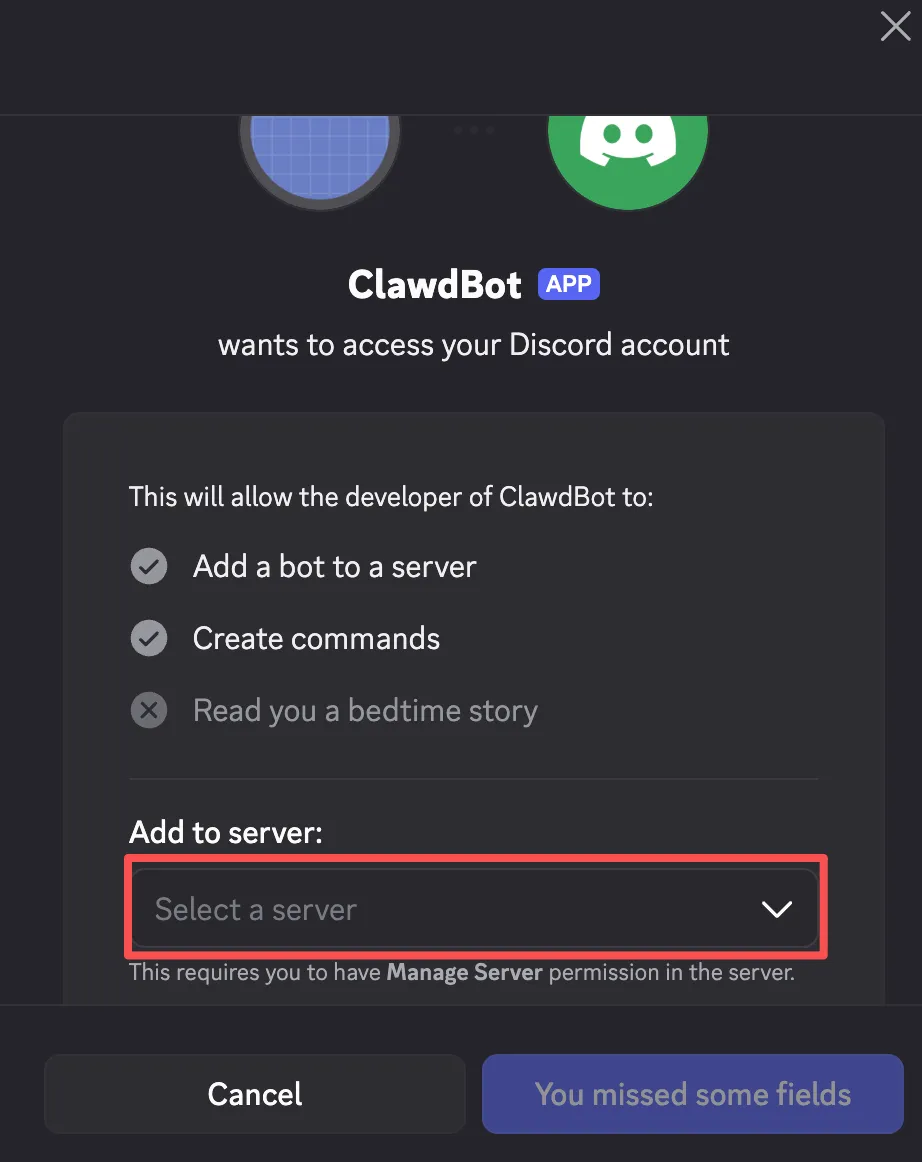
Copy the generated URL at the bottom, open it in your browser, and authorize it to your server. If you don't have a server yet, you can create one by clicking the + button on the left side of the Discord client.
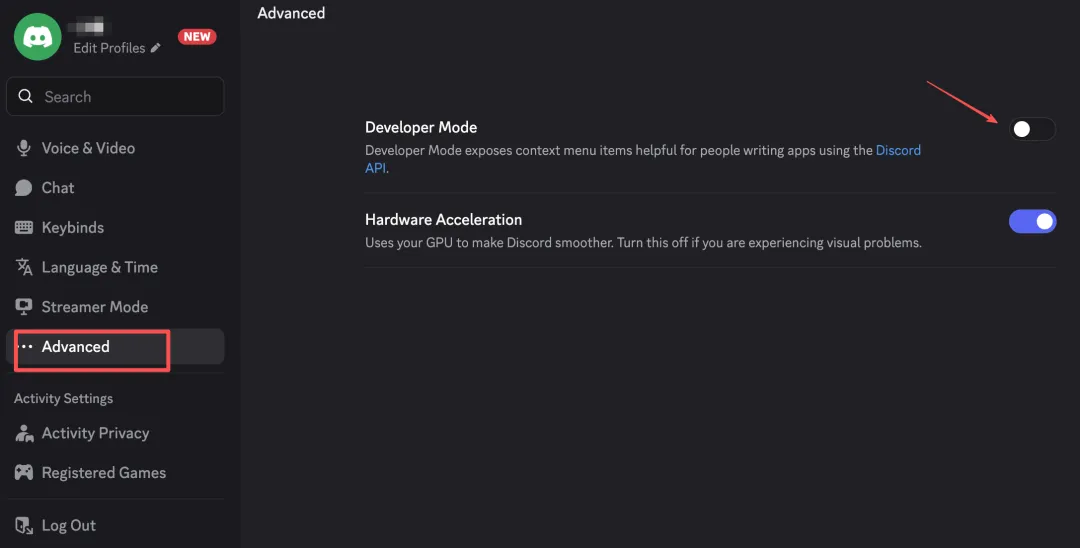
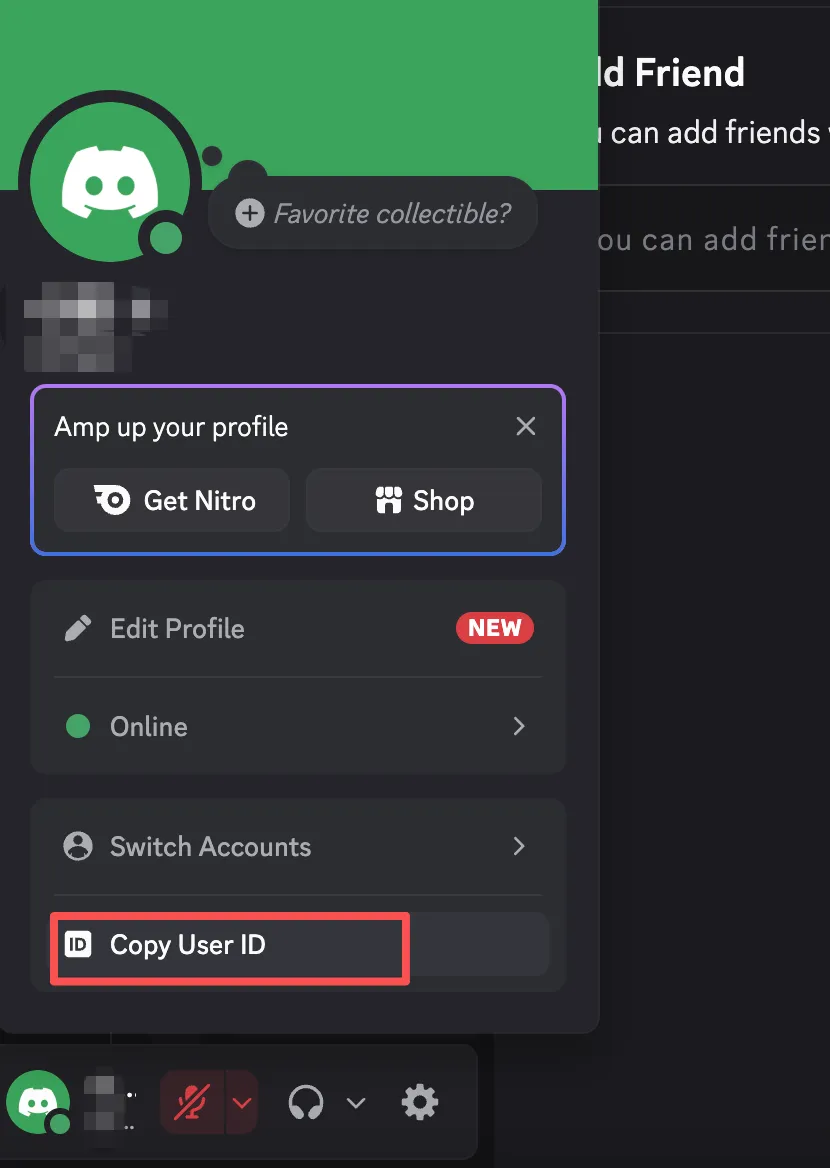
Get Your User ID
In the Discord client, click the gear icon in the bottom left to enter settings, find "Advanced", and enable "Developer Mode". Then return to the main interface, right-click your avatar, and select "Copy User ID".
Complete Configuration on Server
Return to the SSH terminal and paste the Bot Token as prompted. After entering this, it didn't ask me to enter the Discord User ID again, not sure why.
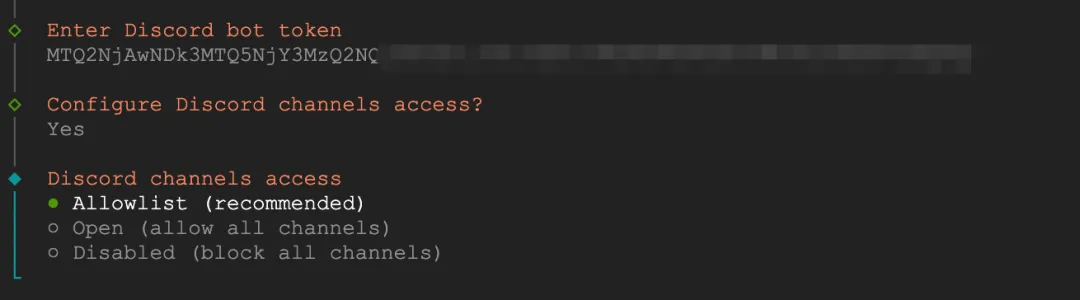
Next it will ask about Discord channels access - select Allowlist (whitelist mode). The next step asks you to enter allowed channels - just press Enter to skip, as it's safer and more convenient to interact with the Bot through direct messages later.
Complete Remaining Configuration
Next are some optional configurations:
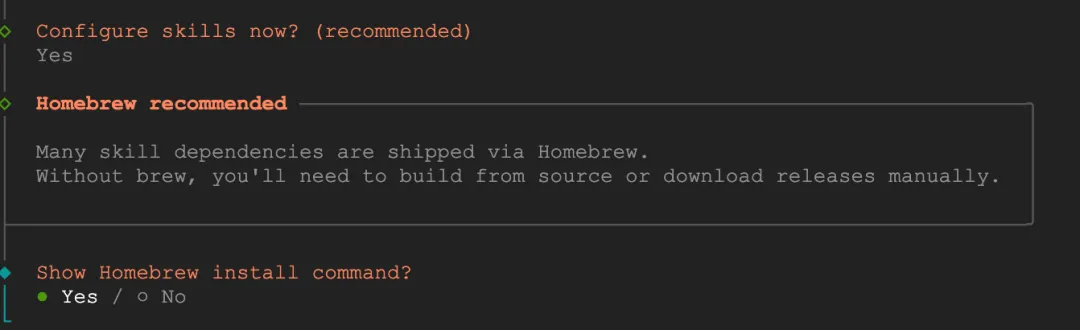
Configure skills: Select Yes. This is ClawdBot's skill plugin system that can extend various functions.
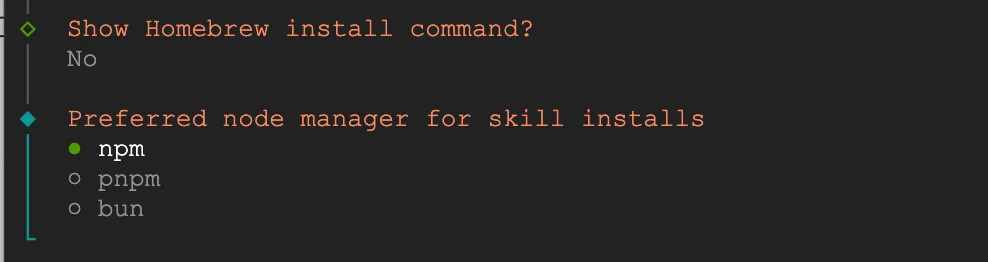
Homebrew: Select No. We're on an Ubuntu server, not Mac, so we don't need Homebrew. (Choose based on your deployment situation)
Node manager: Select npm, it's already installed on the server.
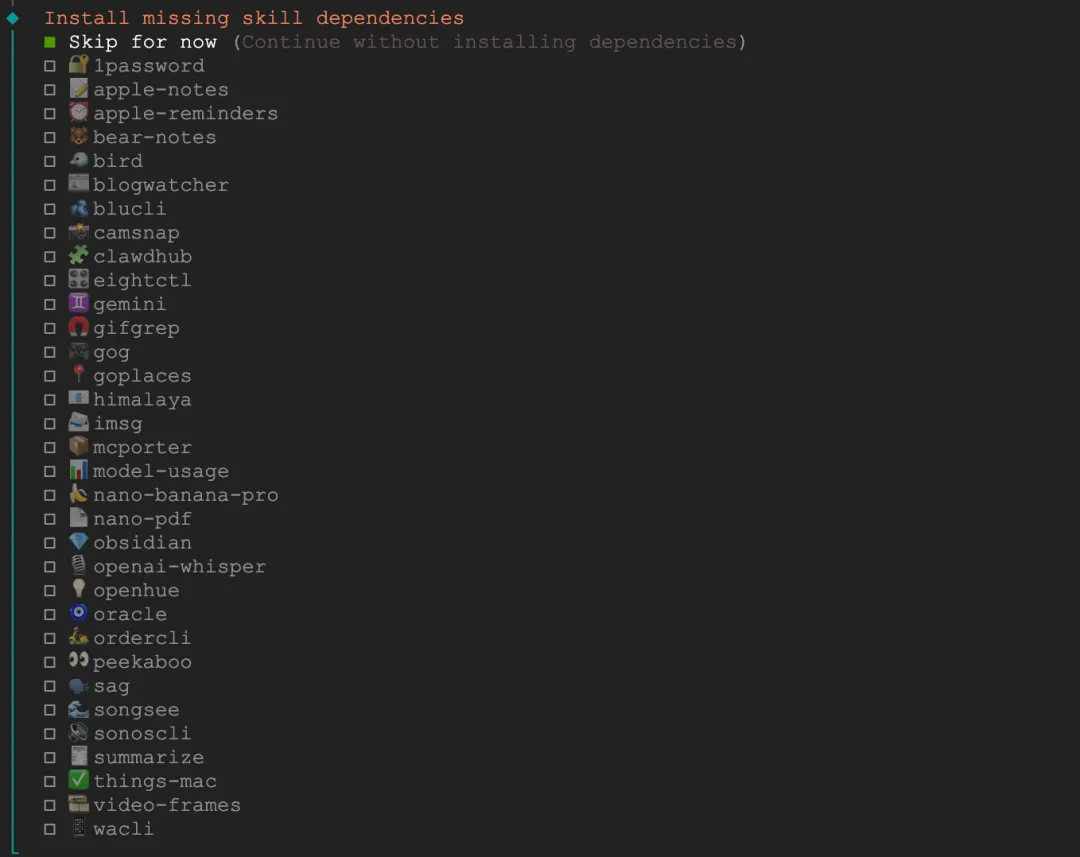
Install missing skill dependencies: Select Skip for now. Most of these skill plugins are Mac-specific (apple-notes, things-mac, etc.) and won't work on Ubuntu. Install skills individually later as needed:
npx clawdhub@latest install If you're using Mac or Windows, you might want to consider these.
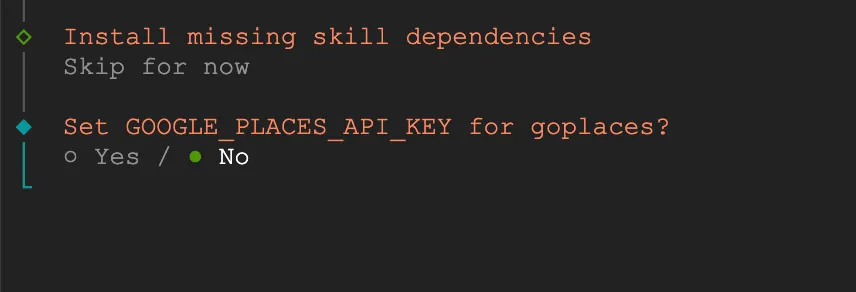
Google Places API: Select No, we don't need location search functionality for now.
Next are hooks - I selected all 3. boot-md automatically reads a markdown file as initial context when the Bot starts. You can write your usage habits, project information, and special requirements there, so the Bot remembers this content every time it starts without repeating instructions.
command-logger records commands and important operations during your interaction with the Bot. When problems occur, you can check the logs to see what went wrong, and it's convenient for reviewing what you've done. However, if you're privacy-conscious and don't want operation records, you can disable this.
session-memory saves conversation state, allowing the Bot to maintain memory continuity between different sessions. With this enabled, if you were chatting about something yesterday, you can continue today and it will still remember.

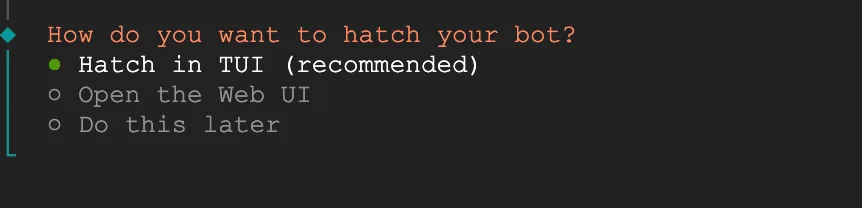
How do you want to hatch your bot: Select Hatch in TUI. Since we're connecting via SSH, the terminal interface is most convenient and doesn't require additional port configuration to access the Web UI.
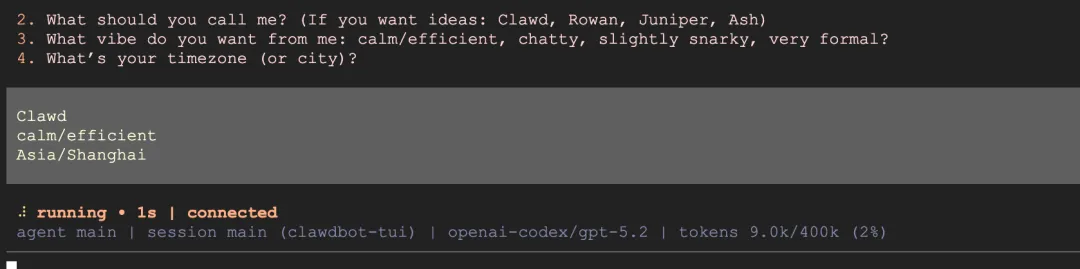
After configuration is complete, the Bot will start and ask you a few initialization questions:
- What should I call you? → Enter your name
- What should you call me? → Give the Bot a name
- What vibe do you want from me? → Choose a style, recommend calm/efficient
- What's your timezone? → Enter timezone, like Asia/Shanghai
After answering, you can start using it normally.
Ensure 24/7 Operation
To keep the Bot running after closing the SSH window, enable service persistence:
loginctl enable-linger $USERYou can send this command directly in the ClawdBot conversation window since it will execute it (it's a super powerful agent after all), or you can open a new terminal window and execute it manually.

Run clawdbot status to check the status. If you see Gateway service showing running, the configuration is successful. Now you can safely close the SSH window - the Bot will continue running in the background and will automatically recover after server restarts.
Installation and deployment complete!!
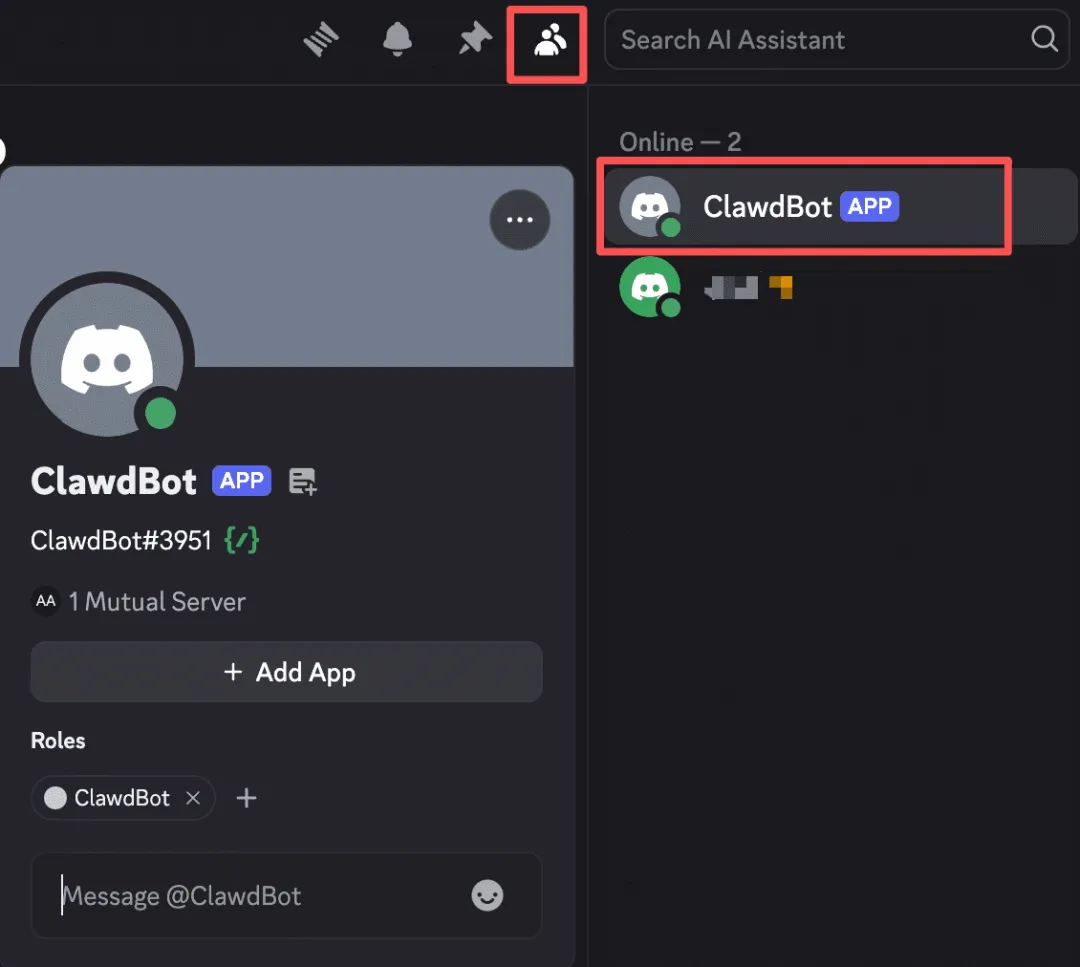
Start Using
Open the Discord client, enter the server where you invited the Bot, find your Bot in the member list on the right, and you can message it to guide it in answering questions and doing work. Having a super assistant feels great even before actually using it.

The first time you send a message, you might encounter an "access not configured" prompt. This is because we selected whitelist mode earlier but didn't pre-add our own User ID.
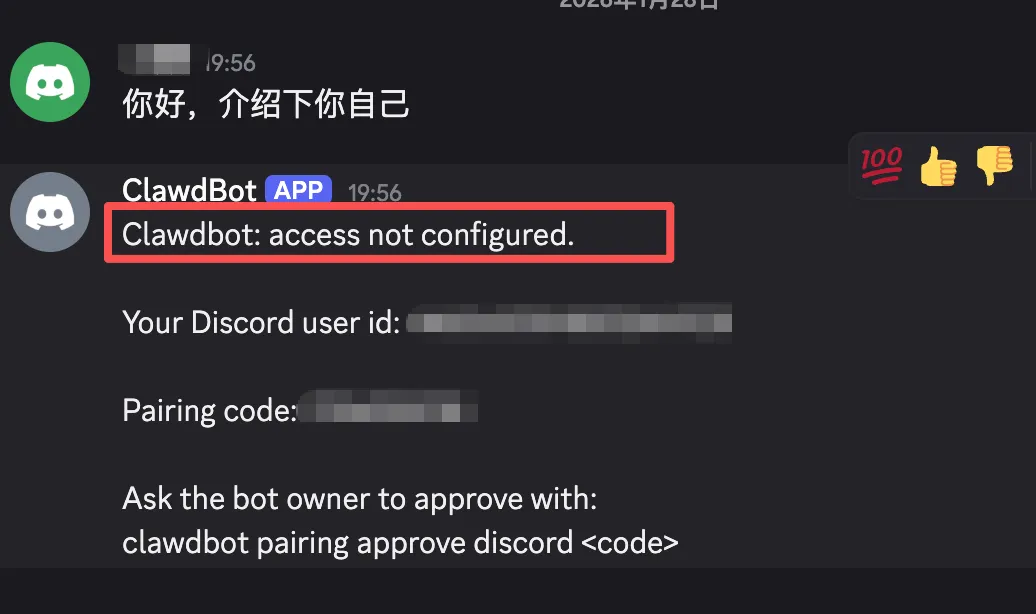
The Bot will give you a pairing code. Run this on the server:
clawdbot pairing approve discord 
After authorization is complete, you can chat normally. This is a one-time operation - no need to pair again later.

Common Commands
Since it's deployed on a server, here are some commands you'll need for daily management:
# Check status
clawdbot status

# View real-time logs
clawdbot logs -f

# Restart service
clawdbot restart

# Stop service
clawdbot stop

# Manage messaging channels
clawdbot channels list
clawdbot channels add
clawdbot channels remove

# Install skill plugins
npx clawdhub@latest install
For data backup, regularly archive the ~/.clawdbot directory:
tar -czvf clawdbot-backup-$(date +%Y%m%d).tar.gz ~/.clawdbotImportant Notes
Deployment complete! Now it's time to explore ClawdBot's various capabilities. It can set reminders, manage schedules, write code, search information, control smart home devices - lots of functionality.
I've heard this thing consumes tokens like crazy. I'll try switching to a third-party API key later, and also integrate with Feishu so I can message the bot through Feishu, which would be more convenient.
Before actually using it though, I need to remind you about security. ClawdBot has extensive permissions - it can operate files, execute commands, and access browsers. So I recommend running it on a spare machine or cloud server, not on your main machine. Back up important data and have it confirm before executing sensitive operations.
I'll update with new developments as I continue experimenting.